You might have noticed we are currently experiencing a Docker frenzy. Every day there is a new framework or service popping up that is based on Docker. A lot of people have been asking what this Docker thing is all about. I’m going to try to explain what Docker is and see how it it fits into a Java developers ecosystem.
What is Docker
Docker is an open platform for developers and sysadmins to build, ship, and run applications. It basically allows you to create a container for your service with all its required components. Every application needs quite a few things to run correctly, which can all vary from one system to another, just think about it: the Operating System and related libraries, JDK 1.x, application server and so on.
If you have ever promoted an application between different development, testing and production environments, you know it is very hard to make sure that all environments are exactly alike and don’t have different versions of all your needed dependencies. This is an issue that will be resolved when using Docker. You get an very easy way to put all these dependencies into a container and shipping it between environments as a package. These different environments could be a developers laptop up to a production server.
To improve the quality of your release process, you should only be building your application once and passing the result binary of that build process to each of your environments instead of rebuild it each time for each specific environment. This is one of the important treats of a successful Continuous Delivery process. Now we want to take it one step further, instead of building your application once, we’ll take your application together with its required building blocks and build that once into a so called Docker container. You don’t have to worry if patch x.y of the OS is installed or patch Z of the application server is already installed on the test environment or the production environment. These patches would packaged together into your container, so each environment that is running the latest version of your container would in fact have the necessary patches. Every environment comes closed to being identical to each other.
Docker vs Virtual Machines
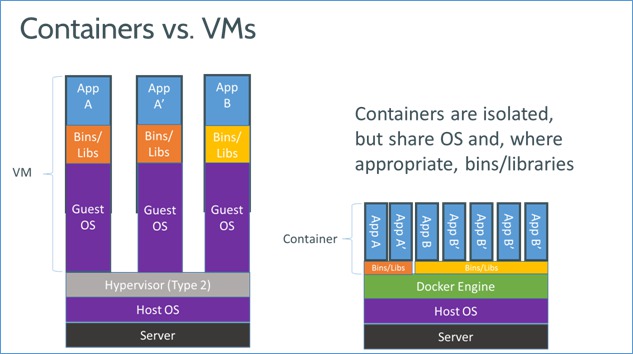
Now you might think, wait a minute we can already do this with Virtual Machines, and you’re right. Yet Docker takes containerization to the next level. Instead of virtualising the entire environment and running a hypervisor, a guest operating system and so on which take a lot of resources, Docker uses your system resources and operating system directly which minimizes the overhead.

If you are an experienced unix veteran, you might know the pieces that Docker is using under the hood. Docker is using namespaces to create an isolated workspace for each container. Containers are constraint to its host systems resources by using cgroups. This makes it easy to share resources with several containers but also make sure limits can be imposed to a specific container. Union file system is used to create to build several layers on top of each other so layers can be reused by other containers which saves a lot of disk space. All these technologies aren’t particularly new, but Docker does a great job of combining them all and giving the user a clean interface on top of it.
Docker Hub and the community
The Docker Hub is an amazing registry where you can store and find public images of all sorts of services and applications. You can compare this GitHub, where people can make and share their source code. In this case, the Docker Hub lets you make and share Docker images in a very user friendly way. When you’ve build a Docker image, you can push it to the Docker Hub and other people can download it to get started with it.
There currently are already more than 45.000 public images in the registry, so almost any application you can think of will probably be already be in there for your to (re)use if wanted. There are also a lot of official images, these are images which are verified by Docker, like for CentOS, Debian, MySQL, Java, Jenkins and so on.
You can also upload private images to the Docker Hub, you can get one private repository and if you want more you’ll have to pay. If you decide to use Docker, you should really think about hosting your own Docker registry. This is a trivial task since you can download and run a Docker Registry as… a docker image!
How do I get started
First you’ll have to install Docker. Docker currently only works directly on Linux systems, but for Windows and OSX users there is a wrapper boot2docker that installs a mini Linux Virtual Machine which doesn’t give too much overhead.
Building your own Docker image
Now you’ve seen how to get images from the Docker Hub, what about if you want to build your own image. Everything starts with a Dockerfile, a simple text based file you will create which what you want your environment will look like. Let’s take the Linkshortener REST API we build last time, which was a executable jar file that launches its own Tomcat server and put it inside a Docker container.
To get started we add a file called Dockerfile into the root of our maven project. This will be the only file we need to maintain to instruct Docker how to build and run our application. This file will contain a set of simple commands to construct an environment with our application.
I have chosen to base my image on the public dockerfile/java which has several versions, called tags, available. The tag we will be using has the Oracle JDK 8 installed in a Ubuntu environment. This is done by using the FROM keyword and refering to the Docker image name:tag we want to use. The tag version is optional, but if you don’t specify it will just take the latest available version which can lead to an unreproducible build.
Dockerfile
 FROM dockerfile/java:oracle-java8

MAINTAINER Driss Amri

ADD target/linkshortener-1.0.0-SNAPSHOT.jar /app/linkshortener.jar

CMD ["java", "-jar", "/app/linkshortener.jar"]
This Dockerfile does not contain much logic, since setting up the environment is already done in the image we are building upon. The only thing we need to do is adding our linkshortener-1.0.0-SNAPSHOT.jar from our host machine, which is created by running a maven build (mvn package), and copy it to inside our Docker environment. This is done by using the ADDkeyword.
The final part is defining the command that has to be executed when we run this image. We can do this by using the CMD keyword, which can be defined as an array. The first parameter is the program we want to execute, followed by all the arguments we want to pass to it.
There is also an entry MAINTAINER to define some metadata about the docker file, about who is the maintaining the file, this is completely optional of course.
This is all we need to do to define the container for our application. From this Dockerfile we have to build an actual Docker image that can be run and transferred between our different environments (development, test, production). This is done by executing the following command:
docker build -t drissamri/linkshortener:1.0 .
We are telling docker we want to build an image called drissamri/linkshortener, which is the recommended approach of naming your Docker container. We are setting a prefix which can refer to a company or user name and then giving a name for the actual application. We are giving a specific tag name to this build, which is version 1.0. As a last step, we are telling Docker where it can find its Dockerfile by passing it the current directory using the . notation.
When you are executing this command for the first time, it will take some time since it has to build all layers defined in the Dockerfile, but also the ones we are building upon by basing it on the dockerfile/java:oracle-java8 Docker image. Next time we execute this command, it will be much faster since it is caching all its intermediate layers and only rebuilding the ones that actually changed since the last build.
 bash-3.2$ docker build -t drissamri/linkshortener:1.0 .
 Sending build context to Docker daemon 27.66 MB
 Sending build context to Docker daemon
 Step 0 : FROM dockerfile/java:oracle-java8
 ---> 3cd60ec40fa7
 Step 1 : MAINTAINER Driss Amri
 ---> Using cache
 ---> f5b8523f06af
 Step 2 : ADD target/linkshortener-1.0.0-SNAPSHOT.jar /app/linkshortener.jar
 ---> Using cache
 ---> ce29c01e1764
 Step 3 : CMD java -jar /app/linkshortener.jar
 ---> Using cache
 ---> 9298fee10e4e
 Successfully built 9298fee10e4e
Once this is done, we have a local Docker image with the specified name. We could upload this image to the Docker Hub or another Docker repository to share it with other people. We won’t do that today, but it’s nice to know that this process is very easy. Now we have our container, let’s actually start up the web application.
docker run -p 8080:8080 drissamri/linkshortener:1.0
This is all you have to to start up your own container and expose port 8080 from the docker container and map it to port 8080 of your host. If you are running Docker on Linux you can access the application http://localhost:8080/links. If you are using boot2docker you’ll have to check what IP it is using, you can find it out by running boot2docker ip . In my case I’m able to access the application by going to http://192.168.59.103:8080/links.
This is one way to get your application up and running inside a Docker container.
Continuous Delivery
If you are already doing Continuous Integration, you could easily plug Docker in to that process. Your Jenkins, Bamboo or whatever you are using is building an executable .jar or .war file. The next step would be to build a Docker image based on your application deployable. When you’ve created the Docker image you could then upload this to the Docker Hub or your private Docker repository. Its good to know that Artifactory already supports storing Docker images.
Your deployment plans for each environments can simply download the Docker image and transfer it to the target environment and start the image. The environment specific configuration like database URL and credentials could be passed a startup arguments.
Conclusion
This post was a simple introduction to Docker and to show you how you can run Java application into a Docker image. In this example I’m using Spring Boot and an executable jar file. If you are using an application server, you will need to base your Dockerfile on another image. If you can not find the right image, you can take care of the setup of the environment yourself, which is not a hard thing to do. In future posts I’ll expand more on Docker use and also on cloud deployment options, like deploying your containers to IBM Bluemix.
I hope this has shed a light on the whole Docker hype since it doesn’t look like its going away any time soon.
You can find the source for the Linkshortener application and the Dockerfile on GitHub. You can learn how to deploy Docker containers on IBM Bluemix PaaS in my other blog post.